Sunday, June 19, 2016

Engraving Robot Mark III


Having received a small "order" for a few engraved pieces of cutlery and LEGO parts, I've built a new version of the engraving robot. This one has been rebuilt to avoid most disadvantages of the previous designs, and is smaller, more reliable, slightly faster, and puts parts under less strain.


As opposed the previous versions 1 and 2 ran by NXT, this one is based on EV3 controlled directly from the PC in realtime, via the MindControl Python library unveiled earlier. The reason behind it was the EV3's support for four motors. Beside the two required for X-Y movements and the third one that raises and lowers the drill, the fourth one actually drives the PF switch which turns the drill motor on only when needed. This approach lets it cool down during long movements into desired position. The drill motor itself is not controlled directly by EV3 ― it is a standard 74569 powered by an old train controller.

Similar to the previous versions, this Mark III employs long linear actuators for X-Y movements and compensates for backlash by over-turning the motors in one direction and then returning to the desired point. Drill is lowered by another linear actuator, connected via the parallelogram linkage connected by friction pins, in order to provide very accurate movement control.

The drill point, a standard diamond-tip sort bought in a local hardware store, is the only part which is not pure LEGO. It is connected to the motor shaft via a small holder which keeps two rubber 2L connectors tightly together. The entire module consisting of a drill point, holder, motor and its supporting structure is actually moving while lowering the drill, and it can also be raised and leaned aside to allow easy access to the platform and the object being engraved. As before, the movement mechanism had to be rather sturdy to minimize backlash as much as possible, and the standard Technic frames did just all right for the purpose.

The overall performance was satisfactory. I'd prefer the entire mechanism to work faster, though; the 4x2 tile with a design of average complexity took about 25 minutes. I think it can be reduced by at least a half, but running the risk of the drill moving too fast and not engraving deep enough. Interestingly, the overall results were slightly better on metal than on a plastic surface, mostly because of plastic's softness, allowing some slack and shake while drilling.

This was an interesting experiment. However, I guess the next direction to improve towards is not speeding the process up further, but rather expanding the drilling surface, which is currently limited to the extents of the linear actuators, i.e. approximately 40x40 mm. Employing the new sliding racks it should be possible to double that at the very least.


Friday, April 8, 2016

MindControl 1.0 for Python

http://www.legoism.info/p/mindcontrol.html

Recent weeks I have been working on a Python module (library) for controlling Mindstorms EV3 and NXT, and ― here it is! I have set up a separate page for it as it may receive updates, documentation changes, etc., so head there to find more about it and download it. Of course, you can freely use it for your own projects.

Its name is MindControl and, briefly, it is a module that conveniently links Python, a programming language, to EV3 and NXT Mindstorms devices, letting you control motors, sensors, etc. directly from the scripts on your computer (or anything else you run Python on). It can control multiple EV3 and NXT devices simultaneously, communicates with them via Bluetooth, is synchronized, and is fully native on both sides, i.e. you can run it using standard LEGO firmware and without any exotic Python extensions.

For example, rotating four motors with various angles on EV3 is as simple as this:

import mindctrl
device=mindctrl.EV3('COM8')
device.rotate(90,-180,270,-360,speed=65)

And add this to keep the motor 1 spinning step-by-step until the touch sensor on port 1 is pressed:

while not device.sensor(1): device.rotate(30)

You can use other functions and parameters (documentation is, remember, at the dedicated page along with the downloads and the rest) for controlling relative motor movements, sensor measurements, playing tones, logging, etc.

The aim was to provide a library which has sufficiently many features to cover 99% of Mindstorms projects, yet to be simple enough for nearly everyone to use and not burden the user with low-level communications and flow control. And Python (v 3.x in this case) is, in my humble opinion, just a perfect language for that.

Happy coding!

Sunday, June 28, 2015

GT Crawler

P1050862

As opposed to my previous off-roader, the Red Raccoon which has occupied my desk for good three months through at least five versions, this time I've had a clearer picture what I'm aiming at, therefore this GT Crawler required "only" two weeks.

P1050869 Let's begin with mechanical stuff. The intention was, among other things, to try out a combined suspension and direct-to-wheel drive. Typically, a large share of off-roaders features either a free-axle suspension or trailing arm design. The weakness of the former is that the turning axis of the front wheels changes as the chassis rises and sinks, while the latter offers, depending on the type, weak wheel independence or complex construction. This time I've tried combining these: each pair of wheels is built on a pendular axle, which is in turn connected to a large trailing arm via a turntable. The chassis is, of course, in between, along with its recentering mechanism so that the bodywork doesn't freely tilt in the curves. Since the trailing arms have been designed to offer a very large travel, there was a lot of spring required ― as much as ten were required to keep the chassis in balance (not sunk to the bottom neither forced up to the top).

P1050866 The other concept regards the drive; each wheel is connected directly to its own PF Medium motor, without any U-joints, gears or transmissions, in order to keep the mechanical losses to the minimum. This, of course, is a trivial task at the rear, but is quite a challenge at the front wheels because the motors need to turn along with the wheels during steering, implying adventures with the cables as well as a very specific construction that requires lots of room for the moving motors (which at 6x3x3 studs aren't small). And furthermore, find some more space for a PF Servo and keep everything stiff, unfortunately reducing the ground clearance somewhat. The two battery packs are placed at the sides of a rather small chassis root, and right above them, three *PF IR receivers: two for the motors (on the same channel, each pack runs its two wheels), and another one for the headlights.

The bodywork, apart from the headlights as the only "function", serves no other purpose than a decorative one: the chassis can be driven just as well without it. Unfortunately, various reinforcements and PF elements in the middle eliminated any possibility of a nice interior, but that was not too much of a trouble because that would only increase the weight of an already not too light 1.9 kg. Dimensions are 48x28x24 studs, therefore very close to the 9398 4x4 Crawler (GT is slightly lower, wider and about a quarter of a kilogram heavier).

P1050871 GT Crawler drives and handles pretty fine. Although the PF Medium motors don't offer a serious torque making this car unable to climb steep hills, it is compensated by excellent torque distribution and a good maximum speed. More of a SUV than a crawler in that respect, then. The only drawback of this design is that the batteries in the packs need to be very close in charge, because any small differences in the torque on either side make the crawler slightly turn towards the weaker side if driven straight. (The option to split batteries on front and rear ends instead of the sides showed to be too complex, and would also discharge the packs unevenly through time.)

GALLERY

P1050853 P1050859 P1050874 P1050878 P1050887 P1050888 P1060009 P1060016

GENESIS

P1050200 P1050206 P1050795 P1050813 P1050825

YOUTUBE

Saturday, November 1, 2014

70816 Benny's Spaceship Review: A Flashback in Blue

Main

I know this is primarily a Technic/Mindstorms site, but I like Classic Space as well ― as do many AFOL's in their mid-thirties nowadays. And so I just couldn't resist buying an official neo-Classic Space set that has recently been launched along with the Lego Movie: a 70816 "Benny's Spaceship, Spaceship, SPACESHIP!". It consists of 903 pieces and is by far the largest ever set in the Classic Space department. It's actually, in terms of part count, the second largest set in the overall Space family, not counting the Star Wars monsters. Despite the name, this set actually consists of two craft.

Droids Design is a very personal thing, and while this spaceship perhaps isn't as elegantly streamlined as other LEGO starships of the post-classic era, it is supposed to be a remake of the Classic Space, and I find it very faithful to its design principles that focus on function rather than spectacular looks. As one would expect from a Neo-Classic, it is mostly blue-grey, with a trans-yellow cockpit canopy. The secondary craft is more of a Blacktronesque thing, certainly more modern, and its black-red theme works nicely, too.

The Big Blue has also a handful of features: openable cockpit with three minifig seats, openable mid-section, rotatable dish antenna in the rear, and ― the main party piece ― wings that can extend outwards, thus freeing the room for twin rocket launchers otherwise concealed in the hull to shoot. This is done cleverly by pushing the rear rocket, which in turn widens the wings using Technic beams inside. There are also smaller "Antenna" shooters, based on part 15301c01.

Extend In the middle compartment there are extra seats, some tools and a power generator (a reactor of sort?) is visible in the rear behind the window, which is pretty cool. In the rear there are two droids with their auxiliary equipment. Despite being neat, I have a slight feeling that the front of the ship could have held some more functionality than openable cockpit. But perhaps I'm just spoiled. There are two small, detachable ships at the ends of the wings. They have to flip one wing upwards to allow connection to the mothership, and it is nice that everything is symmetric, so both mini-ships fit on both wings. They can carry one minifig each. The smaller ship offers an openable canopy for its one-man cockpit, and that's about it, though one could hardly conceive of more functionality crammed into this small craft.

Interior While it doesn't suffer from any construction issues, I found the large ship somewhat fragile. Not its hull, which is fairly strong and sturdy, but rather plenty of details such as wings, missile launchers or the dish antenna, that need the slightest of forces to detach. It's fine for playing on the table top, but I guess waving it around may result in some (fortunately, repairable) damage.

Both ships are fun to build, and personally I've been positively surprised by the amount of hidden Technic parts and the clever way they are used to allow the ship to be built in steps, yet effortlessly connected together when everything is done. A bit of Technic is responsible also for the wing-extending mechanism.

Gang At over 900 parts, this is a good parts supply set, and actually the only one available if you intend to build Neo-Classic yet prefer to buy new. A nice cockpit canopy, launchers, lots of bricks and technical details that are useful everywhere, arches and wedges, and many other fine parts are included here. There are five minifigs, all from the movie ― four humans (or humanoids?) and the Astro Kitty. Benny, the Neo-Classic pilot, with his worn-off chest logo and a simulated crack on the helmet, is a clever tongue-in-cheek reference, especially to the old helmets that really are prone to breaking. (I must have broken at least a third of mine at the time.)

PROS & CONS

Minifigs + Good parts supply for Neo-Classic Space
+ Fun to build and play with
+ Lots of nice details
+ Interesting building techniques, especially extendable wings

- Somewhat fragile
- A bit short on functionality at the front

VERDICT

Among the largest and coolest Space sets LEGO has ever released, particularly as a true flashback to the Classic Space days with a sense of humour. But it is fun to play with as well, though one could imagine this is a set likely to be bought by many AFOL's and shall either be used as an exotic new parts supply, or a display piece for the living room shelf.

Floors MainOpen Secondary Subships

Monday, February 17, 2014

NXT Embroidery Machine

NXT-Embroidery-Machine-Main
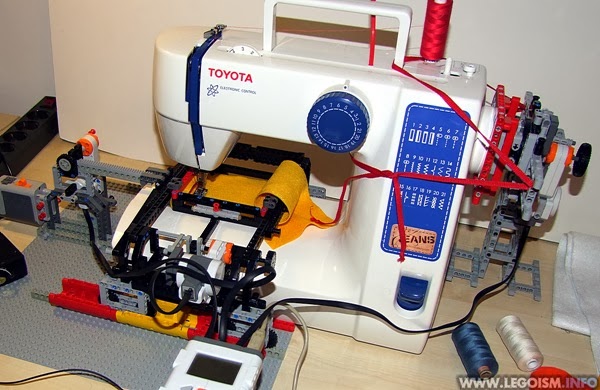
"What the heck is that?" is a perfectly normal response to seeing the Frankensteinian thing on the photo above ― especially if you are a LEGO purist, as the non-LEGO parts outweigh the bricks easily by 5:1 ratio, perhaps even closer to 10:1.

NXT-Embroidery-Machine-Topview But let's start from the beginning, shall we? Not too long time ago, I was outraged by the prices of automatic hobby embroidery machines ― especially in comparison to standard home sewing machines with whom they share most of the mechanical internals, that can be nowadays easily bought for well under 200 Euro. Funky embroidery is sometimes a cool thing to have on clothes (though I am aware it's not particularly macho to say that), and instead of parting ways with loads of cash, I attempted converting a standard hobby machine I happened to have at disposal. Sounds like a job for NXT, right?

There are professional embroidery super-machines that operate with multiple colours simultaneously and can quickly embroider on anything up to a tank armor, but going small and simple, the main difference to the hobby sewing machines is 2D movement control of the fabric (as opposed to linear step movements) and control of the needle, via the master handwheel. That takes three motors, exactly as many ports NXT 2.0 offers.

NXT-Embroidery-Machine-Head I won't go deep into 2D positioning; that has been done a billion times already, using a million techniques. In this case, the fabric is fastened into a Technic 15x15 studs hoop, and moved on two sets of perpendicular rails using standard rack gears. (Due to physical size of the sewing head and room it requires for normal operation, only an area of approximately 9x8 studs is actually embroidable.) I've mostly used standard fleece as the base fabric, as it is relatively cheap, durable, soft enough for the machine to embroider easily, yet difficult to stretch, making the stitch points more accurate. In theory, it should work with other fabrics as well if an adequate stabilizer is used.

While two NXT motors move the fabric beneath the needle, the third one controls stitching by rotating the handwheel. As primitive as it sounds, this was actually by far the most challenging component that took over ten failed versions to get right. Firstly, the handwheel is very smooth and difficult to get a mechanical grip on (at least on the Toyota JFS21 I've used) ― the final mechanism actually rotates it by pushing a switch on its side. Rubber bands were out of the question as the revolutions need to be precise in the long run.

Secondly, the torque required to rotate the wheel occasionally rises beyond 1 Nm, especially when stitching very densely. This is beyond what an NXT motor can provide and requires a strong gearbox, lots of reinforcements and puts plenty of strain on the driving mechanism ― I've actually destroyed a couple of 3/4 pins pushing the machine wheel before I settled with a solution using a stop pin. And even with sevenfold gearing down, the motor obviously struggles at times.

NXT-Embroidery-Machine-Everything An additional requirement for the structure was to keep it as simple as possible to mount and dismantle from the machine, to change the bottom bobbins when necessary and let it be used for its sane, regular purpose.

Software running these motors is rather simple ― it moves the fabric to a desired location, does a full wheel turn, and repeats these two steps until all the stitch points are exhausted. They are imported as numerical data from a CSV generated by a handy application EmbroiderModder which can, in turn, import data from various other formats, embroidery programs, stitching clipart, etc. When sewing in multiple colours, the program stops and allows the user to change the thread on the sewing machine and resume by tapping an NXT push sensor.

And the results? Satisfactory, though by no means perfect. As mentioned before, this machine struggles with dense stitching (though I've seen reports that cheap embroidery machines do too), and the accuracy is often insufficient for very small and detailed, precise designs, e.g. text smaller than a few millimeters in height. Also, it asks for patience: stitching a typical design (say, a thousand sewing points) takes about an hour, so forget about mass production. An hour of loud NXT motor whining, that is. There is of course some more time required to find and prepare the stitching sequence.
NXT-Embroidery-Machine-Classic-Space
However, it turned out to be pretty reliable and perfectly adequate for hobby stuff and making simple custom-embroidered shirts. There's something satisfying in the fact that the combined prices of this sewing machine and a full NXT set are less than a half of what a standard-issue home embroidery machine costs, regardless of its advantages.

A hypothetical future version 2.0 would probably take advantage of the embedded sewing machine motor which is significantly more powerful than anything in LEGO arsenal ― controlling its throttle pedal and measuring the real turns of the wheel, probably with a colour sensor and a piece of a coloured tape glued to the wheel off-center. More complicated and likely less reliable, but a lot faster.

T-shirts with a Classic Space logo (intentional rusty old look, as on the photo) now finally seem a much more realistic wish!

DOWNLOAD

You can download the source files I've used for this project here. However, the parameters supplied within are applicable for my rig ― and if you decide to build your own, you will probably need to adjust them anew, since the rig design depends heavily on the sewing machine being used.

VIDEO


Monday, December 30, 2013

MILSGen

Typical example

Assisting on a side project, I've put together a program named MILSGen that may help designing and building large, geographically accurate LEGO dioramas. It takes an image representing an elevation map, and splits it down to an array of corresponding MILS modules 32x32 studs in size. In case you haven't heard of it yet, MILS is a concept of creating large landscapes using pre-built modules that can be easily transported and quickly connected using regular Technic pins. (Find more about MILS system on the webpages of Antonio Bellón, who developed and wrote a detailed article about it.)

Side code matches all neighboursIt is a simple text application that lets the user choose an input image, where each pixel corresponds to a single stud at the output. Then, it solves the given terrain segment using several common LEGO plates, trying to keep it as "hollow" as possible to reduce the overall weight and part count. Finally, the standard underlying MILS structure is added, and each module exported into LDraw format one can view in LDView, edit via MLCad, etc.

There are some additional features: it automatically crops the input image to the maximum size that can be created with 32x32 tiles, covers the outside structural edges with closed bricks, lets the user choose the physical height of the highest point of the input image, and even to omit the entire substructure altogether if the overlying terrain is all one needs.

Each model is hollow In addition, to simplify the finaly assembly, one can enable the edge identifiers that put a set of 1x1 bricks at each inner edge, which matches its exact unique pair on its neighbour. The modules are named according to their coordinates in the entire system, borrowing the chess system: letters and numbers indicating columns and rows, respectively. E.g. top left corner is A1, third row in fourth column is D3, etc.

What MILSGen doesn't do are reinforcements. Since I wanted to finish it before the year 2400, structural analysis was out of the question; it is down to the builder of MILS modules to judge where are the reinforcements necessary, and in what amount. Also, it doesn't process input colors but just the pixel brightness: the entire output landscape is green. Acquiring an additional image with colour map and approximating it to a palette of common LEGO colours might be implemented in some of the future versions.

Installation is really simple ― just download the ZIP, unpack everything to a new folder, copy your input image there as well, and run the executable. It's not particularly pretty but it serves its purpose. Make sure to check out the PDF with detailed instructions, prerequisites for the input files and some other remarks included in the ZIP file, or separately available here as well.

Legoism-Download

Sunday, August 11, 2013

NXT Auto-Engraver Prototype

Lego-NXT-Engraver-Main
Typically, the main raison d'être of my LEGO projects is fun, but this one was actually ignited by a specific task that occured, initially unrelated to LEGO: the aim was to engrave a given digital bitmap on a flat surface of a few plastic objects. Sounds like a job for NXT & Technic duet, doesn't it?

Lego-NXT-Engraver-Open Some time ago I've attempted to build an entire NXT CNC for plastic with an electric drill and everything, and it turned out just a tad over-ambitious. This time the basic concept would remain the same ― that is, a vertical rotating drill bit which moves in 3D above the engraved surface. However, this time the mechanical requirements were significantly lower, and the machine doable using fairly regular techniques and parts. The intention was actually to build a prototype as a proof of concept (which explains its ugliness, kludges and devilish colour-clashing), and make a final, finely designed and engineered engraver afterwards, if it turns out to be used regularly.

The drill bit is a standard diamond-coated one used for engraving, and as such the only part which is not LEGO. It is driven by a PF XL and M motors running through and adder to reach sufficient rotation speed without sacrificing the torque, and this structure can be moved vertically with four gear racks and 12T gears, rotated by the first NXT motor. This whole mechanism is suspended on a frame which slides on four rails built using tiles and Technic bricks, and is moved by a pair of large linear actuators running in parallel. The actuators were an obvious choice thanks to their high precision, whereas the vertical movement of the drill is not as critical, since it pushes into the surface to be engraved with the entire weight of the structure anyway.

The Y dimension is regulated by moving the object itself, again on a rail built with tiles and Technic bricks, and moved by a linear actuator ― but this time one was sufficient. The entire extents of the actuators can be used, resulting in an engraving area of slightly over 5x5 studs (40x40 mm), which is more than enough for the objects in question. They are held in place using cradles built from Technic bricks, and secured in place with stop pins. A couple of them simultaneously easily keep the object in place while the drill does its job.

Lego-NXT-Engraver-Structure To speed up and simplify the tedious task of rotating the actuators by hand while moving the drill to a desired starting point, I've added two PF L motors, each of which can be engaged to the actuators' driveshafts when needed using the standard gearbox driving rings, operated manually. In addition, the entire drilling structure can be lifted sideways to allow access to the cradle and the object, and also to change the drill bit if necessary.

The NXT script is very simple ― it reads the movement instructions from an onboard text file. This file is beforehand generated by a short Python program I've made for the purpose, which opens a desired image file, simply rounds it to white and black pixels, and then generates and uploads the file on the Smart brick. It uses a simple scanning algorithm (left-to-right in each line, and each line top-to-bottom) to provide as consistent and precise movements as possible, reduce gear whiplash effects, axle tensions, etc.

All in all, the machine works pretty well. While obviously not engraved on professional equipment, the result was fairly satisfactory and its resolution was even better than I had skeptically expected. For a moderately complex logo about 20x8 mm in size it took about ten minutes, and with some movement optimizations I haven't taken the trouble for in this prototype phase, I'm sure this could be reduced down to about six or seven. Of course, some kind of external power supply is mandatory for mass engraving (which is underway at the time of writing).

A FEW MORE PHOTOS

Lego-NXT-Engraver-Drill Lego-NXT-Engraver-Sample Lego-NXT-Engraver-Superpos

SHORT VIDEO